Monday 30 July 2012

Wicker Man


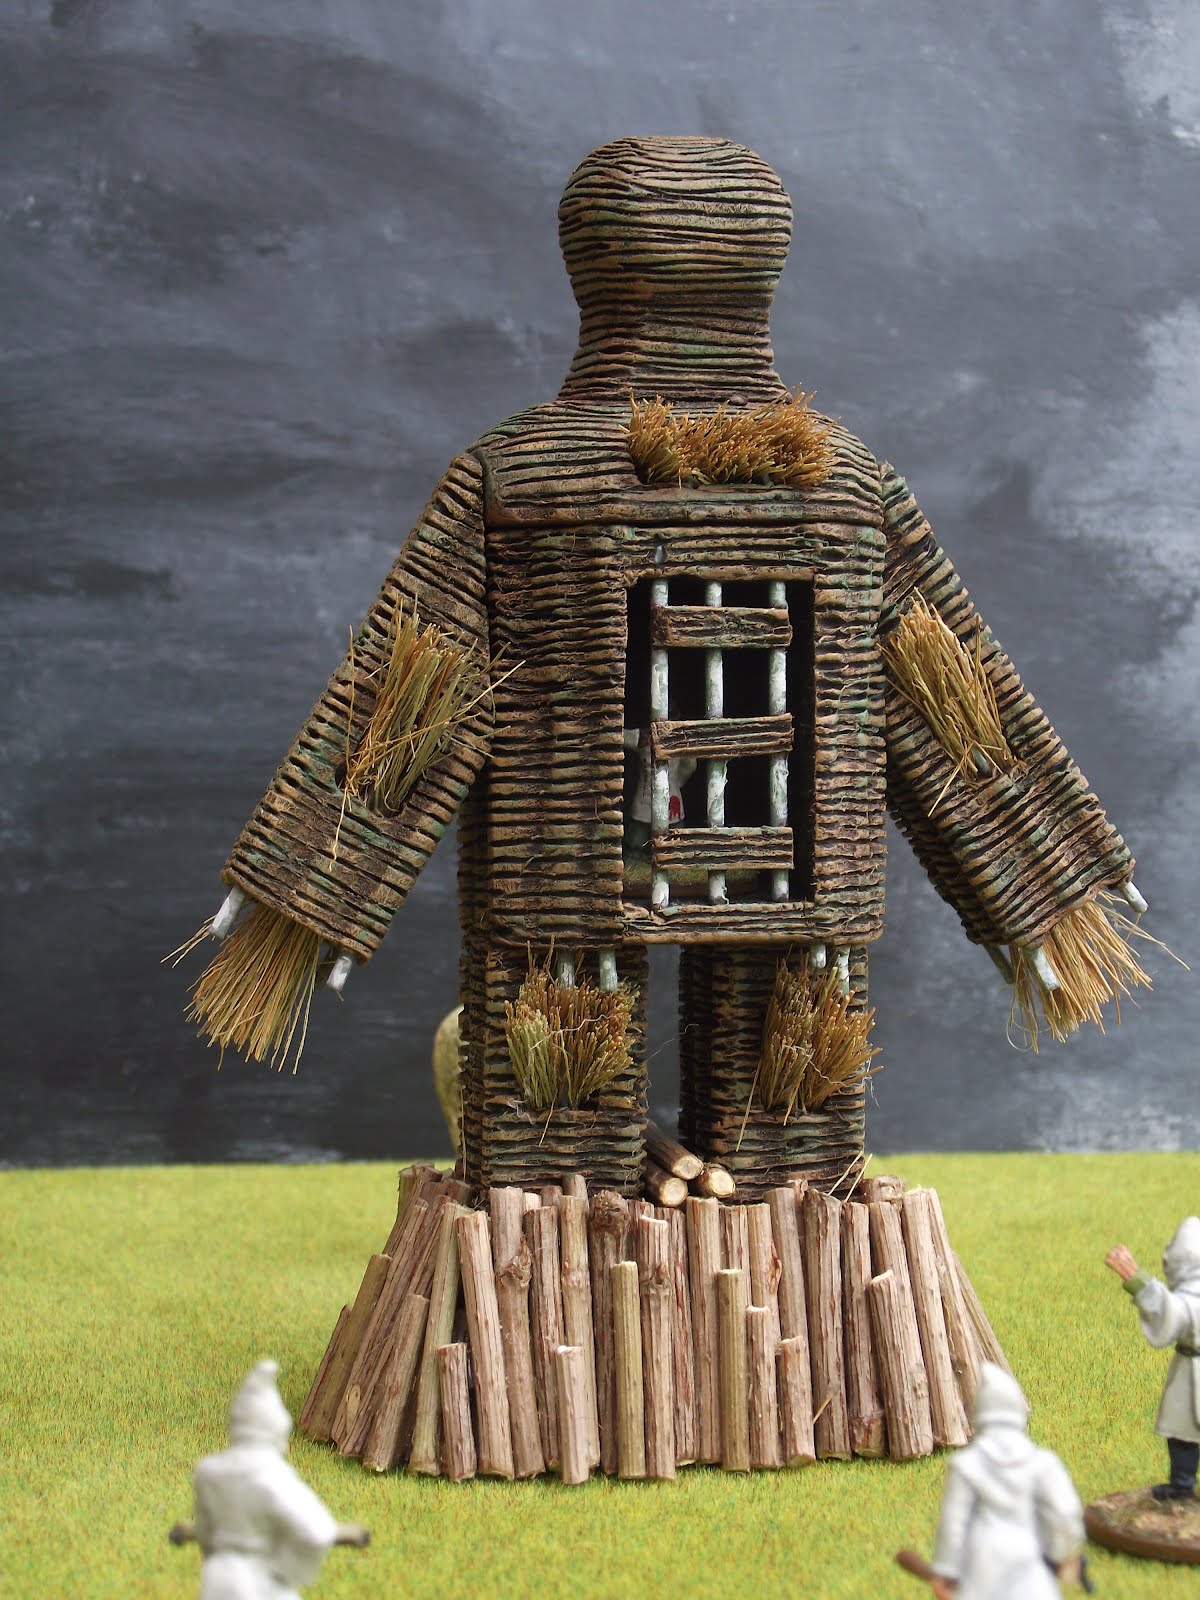
After making Stonehenge I thought about making a Wicker Man, but got waylaid,so I eventually got around to it, my first thoughts was to use brass rods, but they have got pricely last two years,so I went with blue foam,there is no set measurement apart from being able to fit a 28mm miniature in the body,the body size was based on me having a 50mm square length of foam.
It was made to pull apart for two reasons I have not the room to store it and it can fit into one of these plastic food boxes for safe transport. It's not based on any one picture but a combo of the pictures out there.
 What I did was made the body longer then I needed then cut the four corners then I cut a section of the body to make the shoulders doing it like this kept the same contour , then I marked the body and cut the inside out , the piece that came out the body had two sections cut from it one was fitted back in as the base and the other was glued underneath the shoulders.
The weave effect was done by turning down the power on the wire cutter just enough to melt the foam it does not matter if the groves are in line or thick, with the think lines just run the cutter down them, you just want the overall effect of the wicker.
The concave groves that run the length of the body and arms and legs was done using a drimle then the horizontal groves cut , head was marked and cut them remarked and cut again then filed smooth then glued onto the shoulders.
Magnets holes was done using a drill end and heating it up, you don’t want to over heat or you end up with a big hole, two ways of gluing if the hole is a tight fit use impact glue and you want the magnet just below the surface two magnets are easer to pull apart if they not touching, if the hole is to big then what every glue you use you will need to leave over night to set, the set of pictures should help.
Regarding the paint it was under coated black then a umber brown then used a spear shaft for the highlights and a touch of green to make the weathered effect, the door upright beams and other beams are meant to be a silver birth type wood.
The logs around the legs is real honeysuckle.
Over all it came out as I imagined and am really pleased with it, dare say some one will bring out a risen made one but this will do me, best complement ill take is if some one builds one using my ideas.


Saturday 31 December 2011

WIP Fenris Mi-Go

My latest WIP two MI-Go's by Fenris, will this is the picture's of my first one put together.
Compared to other Mi-Go miniature on the market I like these the best.


Tuesday 20 December 2011

Dark Young WIP

Here is a rather good rendition of a Dark Young of Shub-niggurath bye the makers of the game Carnevale.
This is a WIP as you can see I have used 2mm and 3mm magnets for the tentacles so I can easily away pack in my foam case and on the plus side I can reset the pose if I wish.


lurkers

Been awhile since I last posted, so here is some Lurker that I painted up for Strange Aeon.
The Mad Professor


Necromancer, I was thinking a Tudor time line Strange Aeon hence me painting this up.


These three are part of my Undead Lurkers the wee Mad doctor and two Blasphemous Constructs.


Wednesday 25 May 2011

Stonehenge

This is what I been doing lately Stonehenge, I was given a sheet of dense blue foam 2`x 8`x 2``thick and it took awhile to think what was worthy of it but I came up with Stonehenge, the scale is 1/56, I got some measurements from the internet this was for the outer and large inner standing stones, the rest was guess work based on pictures from the net.
It had to be made to pack away so the flat stones are glued on and the standing stone have 4mm x 2mm earth magnets in them and the base, the magnets are set north and south so the stone only face one way the base was of MDF 12mm 3'x 26",I have left the very small broken stone out, these I may put in at a later date.
There was some liberty taken with gaps between the stone so I could place miniatures between them,if you have any question feel free to ask.


Monday 28 March 2011

WIP Heresy Necromancer


This miniature is made bye Heresy and is called the Necromancer, you have a chose of the left hand holding ether a skull or the familiar bird, I went the skull, this was due to the way he was holding the bird, but it seemed a waste of a familiar, so I put him on his shoulder, all this was possible due to me soldering the parts with on no pinning, the right hand I thought about putting a dagger or sword in it, but I found a wand in my bits box and went with that.
Am in two minds weather to paint him flesh colour or the same grey as my Ghoul Cult.
the half-ling standing next to him is also made bye same firm I bought him just to paint up.

Wednesday 2 March 2011

Things I really need to finish


The Tyranid Barbed Hierodule is from Forge World and was bought of EBay two years ago for around £48 and had damage done to it, after striping the paint off I found out that the oven cleaner I used to remove the paint had softened the glue so I got lucky and pulled it apart, I have give it a coat of black primer after doing the repairs with the green stuff.
Am in two minds weather to use earth magnets for the arms for easy removal to help pack it away when not in use or glue the arms on and pin.
There not a lot I can say about the casting from Forge World apart from I never found any filled in air bubble holes under the paint.

Both the Armorcast BattleTech was bought around 1995 and for the last 8 years been sitting in the garden shed, when I bought them they cost Mad Cat £70 and Vulture £65and are no longer in production.
Casting over all seemed ok with just the odd air bubble hole that can easily be filled in with green stuff, fitting the parts together was ok, and any tight parts could be trimmed with a hobby knife.
The one I started to paint up a few years ago is the Mad Cat OmniMech‘s ( Clan designation Timber Wolf).
The other is a Clan Mad Dog OmniMech (Inner Sphere designation Vulture) when I first did the legs on the Vulture one had a slight twist to it, as I used mainly instant clue way back then I was able to use instant clue remover to help remove the leg, so I ended up redoing both legs and resetting them with one slightly forward, it does till you in the instruction if you remove the stop pegs you can reset the legs from the standing to the walking pose, you can see this on the Mad Cat.

I have played Mech Warrior and Mech Commander on the pc and seen some nice cut scenes of battle techs, but these games wont load into my pc.
I no idea what colour am going to paint them, they ether going to be camouflaged or one colour, and the other thing is buying 28mm decals that would fit on them, I know you can buy clan decals but no idea if they will fit, plus I may not like the clans, my idea is to make them mercenary battle techs no clan badge needed or use what I like.

Other thing about painting them is what are they made from steel, aluminium, titanium, steel gives you the option of rust in the red to brown hues, aluminium just turns grey, and titanium does not corroded atoll, even if it was a compound of alloys you would still not have much corrosion.
Ill be starting with Vulture first if I make a miss I can easily restart, the Mad Cat has some what more detail and not so easy to redo.